
This post may contain affiliate links. If you use these links to buy something we may earn a commission. Thanks.
With careful deliberation, thriving food forests and even vegetable gardens can be (and have been) grown with clay soils. The challenges of clay include physical difficulty, compaction, poor drainage, and weeds.
Like most properties, clay is what we end up with when builders take away the topsoil, do their work, and leave nothing behind but clay-heavy subsoil.
Turns out this was the case for us too. But our situations are correctable!
Ever since we started following these steps; what was once unmovable dirt has transformed into a workable, walkable, and growable site.
A garden design for clay soil involves a plan of action; actions with phases. All you need to do is take it one step at a time. In a few seasons, you’ll be able to grow anything that grows happily in your climate.
How to improve waterlogged clay soil
The first 5 phases are essential. With some patience, you can break down clay soil naturally, even if the clay doesn’t drain today. The steps after the essentials include more tips to help you plant a successive food forest and put in a vegetable garden quickly.
Assess your land and decide
To learn how to make the best corrections; assess your land first.
After these assessments, you’ll be able to make decisions on how to physically shape your land to benefit your soil and plants.
The slope and contour of your property in relation to the surrounding land can easily be assessed with this free online tool.
- In the search bar, type: the area you live,
- zoom out from your property and
- click to make two points to highlight the area you want a contour for.
- Click “get data” and you’ll see the colorful lines.
- Take note of the sidebar legend that tells you which colors indicate higher versus lower elevations.
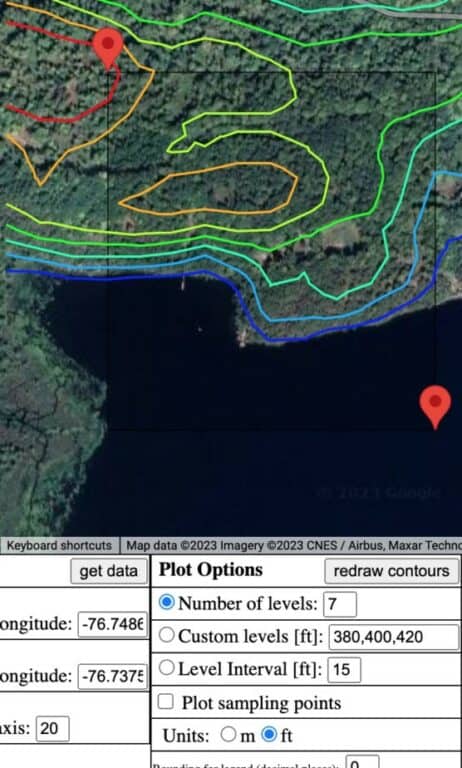
The high points tell you the direction that water enters your property, and you can also see where water leaves at a low.
Scroll down to save the KML file so you can optionally use this to confirm the next step of the assessment.
Tweaking the shapes of your land, whether it’s big or small, largely impacts the success of your plants. The land-shaping I’m talking about is called swales.
Swales are used on flat lands that have a slope of lesser than 15 degrees. They are meant specifically for partnering as a tree-growing system, best done with trees. Whether or not you had trees in mind, your vegetables would benefit from the system too. Trees (and perhaps daikon radishes) are what will save your clay soil faster.
Geoff Lawton easily explains the benefits of swales on poor-draining clay.
If you don’t understand everything he means that’s okay, continue on with the next steps:
- Install google earth so you can verify what slope you are working with.
- Once you have it installed, simply open your saved KML file, and google earth will open with the contour.
With the elevations in mind, select the ruler icon, in that window click path, then click the high and low points of the area you’ll be working with. In our case, it’s the square valley. Tick the box that says show elevation profile
From here, let’s look at your slope. To calculate the slope, we are going to pick out the high point and the low point to do easy math. The higher elevations outlined by the contour lines will help you orient the points for gathering the numbers needed to calculate the slope.

The difference between the top and bottom of the area I am calculating is 5 meters over a distance of 75.5 meters. The math to calculate the slope is (rise/run) x 100. So in our example, we would do (5 / 75.75) x 100 = 6.6% slope.
Since our slope is below 15%, we will benefit from our land by implementing swales!
Note: I didn’t upload my contour lines because I have a good idea already about which angle the water goes in the valley. Also from the previous Google Earth exercise, I knew which way to direct my slope line.
Some comments on Geoff Lawton’s video about working with flat land were pretty motivating for us before we tried it ourselves.

This article was originally published on foodforestliving.com. If it is now published on any other site, it was done without permission from the copyright owner.
The valley, where we have our vegetable garden (and a soon-to-be food forest), is generally very flat and is a large low point surrounded by wide hills. Lots of water is diverted into the garden and waterlogging was a problem since we are working with primarily clay subsoil.
We implemented a small pond at the lowest point as a drain for water to collect. Before we did a proper swale assessment; we also did a trench border around the whole garden which allows excess water to flow into the “pond.” This maneuver isn’t solving the underlying problem.
As we transition the space into a food forest and improve the growing space overall, properly oriented swales are required for the benefits to bloom.
Shape your land for a sensible flow
Orienting your swales “on contour” means slowing the water. As if to create the lines like google maps did. Yes, it’s confusing to think that we want to slow water down in a waterlogged area, Geoff explains it well, I’ll link the video once again to ensure you don’t miss it.
To recap his expert explanation, as you create swales, you’ll be “ripping” or “aerating” the contour so that water can soak down into the ground. Our goal to fix water-logged clay isn’t to create a stream and divert the water, but to create a soakable, sponge-able, drainable, ground.
Oxygen and other leached organic materials are introduced to the loosened clay as the water slowly flows (soaks) through the cracks, gaps, and pockets where they can interact and provide substance for building livable environments for plant roots and microorganisms.
Note: Keep swales away from any foundations; 10 feet or more is recommended.
Aerate all the clay you can (with these tools)
First of all, clay is heavy.
Before anything else, I want to prevent you from unnecessary physical strain. If you’re digging to aerate by hand—A pitchfork is more effective than a shovel. For you, it’s easier to pierce the surface for leverage and to avoid making things worse, it doesn’t create a smooth wall or a slick bowl effect.
Numerous growers even use broad forks to aerate shallow soils because the clay beneath doesn’t budge with anything else. This is a broad fork. They can cover more ground with fewer stabs, are easy to stand on, and are great for leveraging without breaking. Whichever you choose will depend on you and your circumstance.
How do you make the swales?
Map out your contour lines, then get forking!
The mound of your swales will be the area you put plants. First, you’ll aerate the clay where the bed will be, as deep as you can, then, you’ll take from the top of the slope (beside where the mound will be made) to build the lower part of the slope into a mound. The whole mound, and beneath it, will be able to collect, sponge, and drain water.
Plant suitable crops to pioneer the clay
The next step is to plant trees and other perennials that endure clay soils. If you can’t plant anything right away, move onto the next step (add organic matter) and come back to this one.
Trees and seeds are best done before adding amendments. You want to avoid adding amendments or fresh compost into any planting holes. Maintaining the layers of soil, as they are, result in healthier, stroner plants.
Getting a diverse set of roots in the ground is a priority for improving clay. Plants with vigorous root systems need to lead the way so others can follow after a few seasons. Aerating with a fork will only get you so far, the pioneers are in charge of the rest.
Here are 14 plants for clay soil you can start with.
Instead of listing plants to grow in clay, let me show you how to find your own. We all live in different climates and you’ll appreciate knowing all your options.
Head over to the Plants For a Future database. Then tick all the necessary boxes. I suggest starting with hardiness zone and soil type.
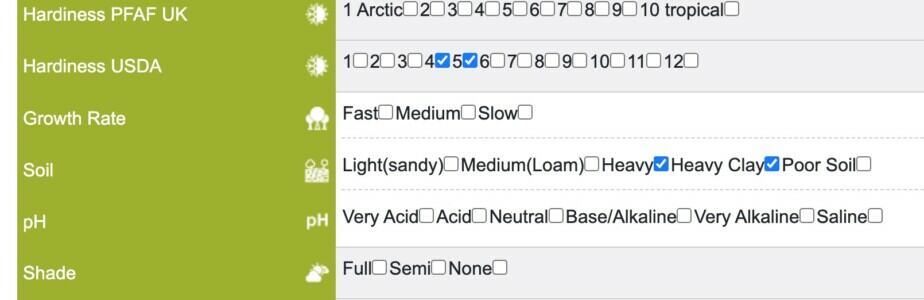
I selected Heavy soil and heavy clay soil, but not poor soil. Clay and heavy clay doesn’t equate to poor, as it might actually be rich. Only a soil test would confirm that for you.
When ready click “search” and scan your options.
Look! All these edible plants that grow in clay soil: Okra, maple, yarrow, tara vine, kiwi, welsch onions, chives, amaranth, serviceberry, beets, swiss chard, birch—good for syrup and beautiful, collards, brassicas, daikon radishes, sunchokes, hickory, pecan, chestnut, quince, good king henry, winter squash, pumpkins, artichoke, and more!
But you might not be as limited as you think. . .
Several growers, Trace Ozwald in zone 4 for example, has “apples, peaches, apricots, cherries, plums, paw paw, persimmon, bushes and berry plants” all growing in heavy clay soil and doing great.
If anything, a diverse range of plant types will be your best bet. Some may not do well, other will do very well. Find out, and plant more of what works for you.
Living pathways will help break up the compaction as well. A cover crop can be applied to all walkways and around your pioneer plants.
Add organic matter
To avoid the return of compaction: organic matter is your best friend. You want to cover the soil, retain moisture, and prevent the surface from becoming a hard, dry crust.
Adding organic matter keeps the sun off the soil and provides livable conditions for microorganisms.
See: What you need to know about mulch
Just as importantly, the more organic matter you add now, while the clay is freshly aerated, the quicker you improve the clay.
First, apply finished compost, aged manure, or worm castings. The small particle sizes of these materials will percolate and amalgamate with the clay the easiest.
Finished compost is also a seedable medium for growing a cover crop!
Cover crops make a great living mulch as it covers the soil once the foliage fills in.
If you prefer to mulch instead of grow a cover crop, just be sure not to mulch too heavily. Your trees and other perennials won’t survive incorrect mulching. My point is that more organic matter, while better for the clay over time, can be worse all at once.
It depends on the state of the material: compost is a plantable medium, mulch is not.
Give it time – slow is less expensive
Now that you have a variety of roots beginning to grow and organic matter added, it will take a few seasons to notice significant improvement.
Planting clay tolerant plants and adding a thin layer of compost, and perhaps mulch, will take longer before you can grow everything you desire.
The only alternative is it to spend more money upfront.
- You could install raised beds,
- plant in pots,
- plant in soil mounds without sides, or
- construct a hugelkulture bed.
If you don’t have the money for amendment or the time to install things; the passive time will be payment.
Related: How Long Does It Take To Grow a Food Forest?
Keep building soil
As you wait, build habits that build your soil. The more soil you build, the more you can grow.
Soil building habits include:
- chopping and dropping
- intentionally creating your own compost
- growing crops specifically for composting
- making use of leaves
- keep the soil covered by a plant or mulch
Avoid soil degrading habits such as:
- pulling weeds up by the root
- tilling after the initial aeration
- Leaving bare soil exposed
- using synthetic fertilizers or pest control chemicals
Soil building, in general, is always a solution.
Introduce desired plants slowly
After a few seasons of little disturbance, check out your soil and leave a comment! I’d like to hear about your progress.
While it may or may not be perfect at this point, your desired plants can be introduced.
Plant your food forest fruit trees on mounds
Trees planted in a regular hole in water-logged clay soil are certain to drown. By planting them on mounds; this doesn’t become an issue.
When digging a hole in clay, it becomes a bowl. Trees don’t thrive in bowls of water. So, how can you make mounds inexpensively?
Swales are perfect in the sense that you don’t need to buy new soil in order to plant your trees on a mound.
An alternative to making swales on contour:
You can make a moat around each tree you plant and use the clay from the moat to bury the tree up on a mound. Fill in the moat with organic matter and top the buried tree with compost, then mulch.
See: The Best Mulch for Fruit Trees Ft. Straight Forward Answers
How do you break down clay soil fast?
There isn’t a fast pass for breaking down clay soil. Life is precious because everything built to create it takes time, vast amounts of time.
The only way to get growing what ever you want on your clay soil “tomorrow” is to take the steps of aerating your clay, pay for fresh plantable soil, then plant trees.
Swales must be partnered with trees for intended performance. If nothing is there to drink the water or break the soil deeply—it will flood in heavy rains and the problem won’t actually be fixed.
How to amend clay soil for vegetable gardening
#1 We did raised beds.
In raised beds you can plant anything right away. IF you get a good batch of soil.
For our big garden, we tried this. Unfortunately, it failed. The soil failed. We got a large batch of “fresh” nutrition-deficient soil (which will be corrected by the company we bought it from.)
But the lesson here; is that taking the time to create your own fertility, on site, by growing plants, composting, and building soil is more valuable.
- You gain valuable skills
- You sustain your own needs
- You know it will be nutrient dense!
- You know it isn’t contaminated if you (or any neighbors) didn’t contaminate it!
If you do want an instant garden, then find a good soil company to buy from. Ask for test results before you make a large purchase, especially if you plant to grow food without synthetic fertilizers! You need to be aware of what you’re buying so you can make the decision if it’s really worth buying.
#2 Add compost, gypsum, and mulch to your soil to attract earth worms and sustain an environment for them. Earth worms are great at breaking up clay soil, and worm castigns are great for plants.
Conclusion
The verdict on repairing clay soil is learning what to and not do with it from here.
So, here are bare-bones basic “rules” that can be applied to any garden type:
- Aerate it first with tillage or manual forking
- Add organic matter
- Cover it with mulch
- Don’t disturb the soil and learn about how to maintain a no-till garden
But at the end of the day, the best way to fix and maintain clay soil involves permanent solutions. Trees are the most permanent you can get, which is why swales—a tree growing system—is the ultimate way to turn clay soil into a medium where diversity can thrive.
Recent Posts
There’s no shortage of full-sun ground covers for zone 4 climates! Each plant in this list can withstand the frigid temperatures and also enjoy the hot sun in summer. Full sun means that a plant...
There's no shortage of full sun ground covers, not even in zone 3! Zone 3 climates offer hot but short-lived summers and very cold winters. So each plant in this list can withstand the frigid...