
This post may contain affiliate links. If you use these links to buy something we may earn a commission. Thanks.
To start what you finish, you’ll need all the essential tools to complete your mushroom logs. Not only will you see all the essential tools needed, but you’ll also see how to set them up for an efficient log inoculation station.
We’ll talk about the absolute essential tools (and possible alternatives) you’ll need to get the job done, and what you’ll need to make an efficient process.
For those who plan to be making many mushroom logs, a few additional doo-dads are 100% worth it.
The right tools will make all the difference in enjoyment, efficiency, safety, precision, and results.
If you’re only making a few logs, and just one time, it’s usually best to cut costs on helpful but unnecessary tools. When you cut corners on tools, however, mushroom logs become a lot harder (and time-consuming) to make than they need to be. We’ve done it!
Additional tools are worth having if you’re planning to make mushroom logs on an ongoing basis.
Related: 9 Best Mushrooms to Grow on Logs (From Easy to Hard)
Related: How to Use Mushroom Plugs Complete Guide
Making mushroom logs is heavy work upfront and requires an investment in appropriate tools. But once you have everything and the work is done you’ll enjoy mushrooms for years with little to zero upkeep.
Keeping logs moist and harvesting mushrooms is all you’ll have left to do if you situate your logs in a good spot. Unless you want to manually shock them into fruiting or don’t stack them properly for colonizing/fruiting; then you’ll only need to move them around once in a while.
Mushroom logs are our favorite way to grow mushrooms. After the upfront work, they are the most passive option, and cheap if you already live in a hardwood woodland.
Related: Where to Find Fresh Wood for Mushroom Logs (9 Places)
Essential Tools for Mushroom Log Cultivation
The absolute essentials do not include the extras (that are worth having).
The essential tools for making mushroom logs encompass the bare minimum you’ll require to get the job done on the lowest dollar budget.
Under each essential, you’ll find the possible ‘extras’ that’ll upgrade your experience and efficiency.
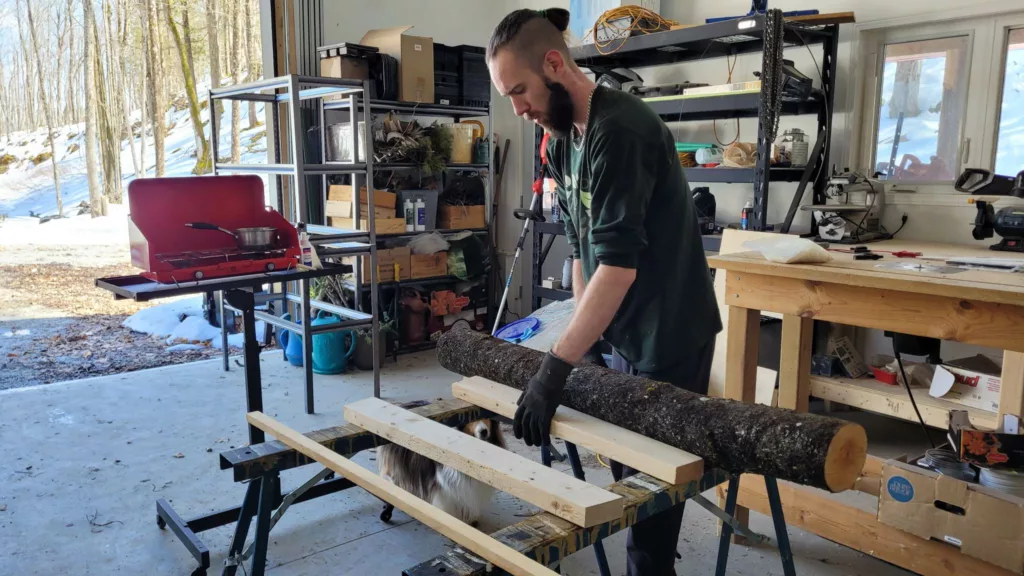
Saw Horses
You could work on the floor, but a pair of saw horses or a regular table makes working a lot easier.
Saw horses make it easy to pick up and turn the logs, and they don’t have to be expensive. You’ll need to turn your logs after every 1-3 rows you plug.
Extra: We use two lengths of wood as wedges to hold the logs in place as we work on them. It’s much easier to work with a stable log, than one that can roll.
Any scrap piece of wood can work as a wedge.
If you plan on doing hundreds of mushroom logs for years to come, then sturdier saw horses will be worth it.
Log Soaking Container
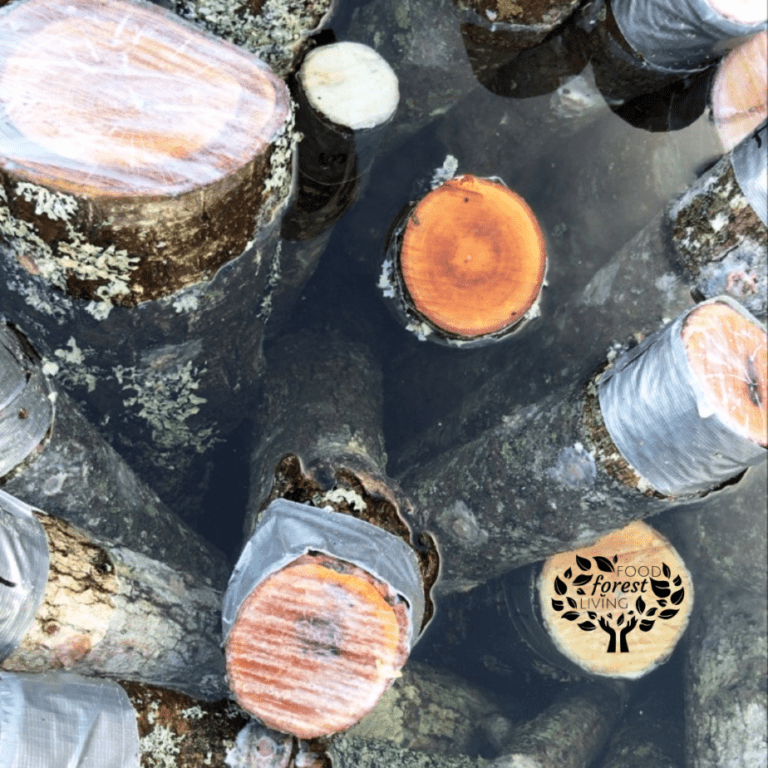
Unless you just cut your logs from fresh healthy trees about 2-4 weeks ago, you’ll need to rehydrate your logs.
We intentionally cut our logs and wait 2-4 weeks before inoculating them to prevent doing this step.
You must wait a minimum of 2 weeks before inoculating fresh cut logs so that the sap from the tree can drain. Sap is antifungal, so you want it drained for your mushroom spawn to colonize the log without a fight.
If you wait longer than 4 weeks, your logs are likely to need rehydrating. You want a moist environment so the mycelium of your spawn does not die.
With a container, such as a tote or steel drum, you can soak your logs for 24-48 hours. We use steel drums since we cut our logs at least 4 feet long. If you’ve cut them smaller, then your typical ‘Rubbermaid’ tote will work.
To tell if your logs need soaking or not, they should have a dime-thickness crack in them. If the crack is larger, they are too dry.
If you’re unsure, it wouldn’t hurt to soak your logs for 2-4 hours before inoculating as a precaution.

Mushroom log spawn
Mushroom spawn is less a tool, but essential to know which spawn type you’ll use before deciding on tools to get.
We use plug spawn (rather than sawdust or grain spawn) since we already have a mallet hammer to get them in. If you decide to go with sawdust, you’ll need a thumb press (rather than a mallet hammer) to insert the spawn.
Mushroom log spawn options:
- Plug spawn (cheaper upfront cost for tools and longer shelf life)
- Sawdust spawn (faster to colonize and cheaper long term)
You can buy each of these spawns ready to go (using QUALITYSPAWN for a discount on all items) or make your own. To make your own spawn, add liquid cultures to a bag of fresh hardwood sawdust or hardwood dowels. Once fully white (colonized) you can use either of the mediums to inoculate your logs.
Drill and drill bit
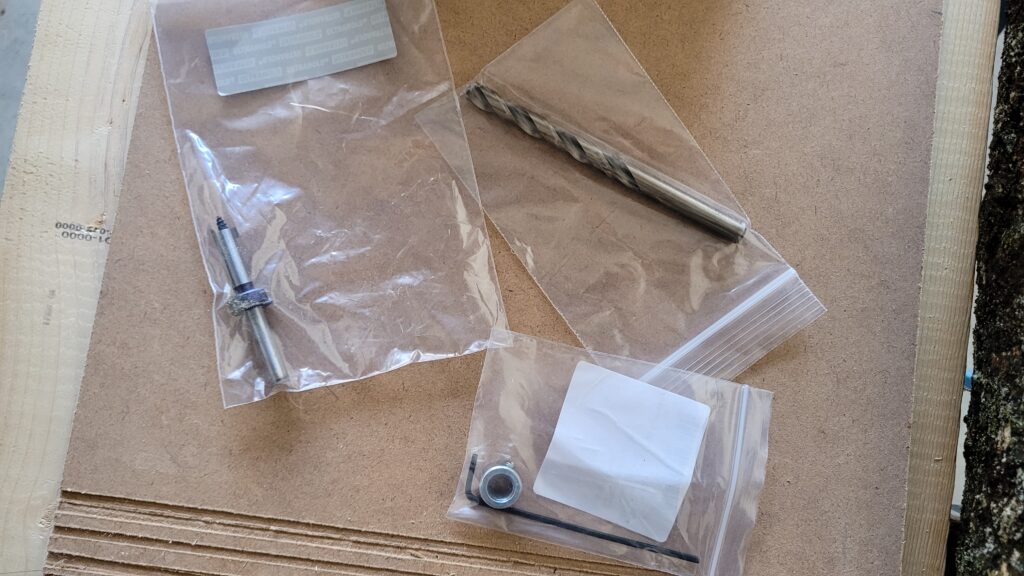
You can’t make clean holes without a drill! Clean holes of the right size are important for retaining moisture and minimizing fungi competition.
We use a regular drill as many do, but some invest in efficiency with a modified angle grinder.
To get holes of the correct size, you’ll need a drill bit for either plug spawn or sawdust spawn.
And if you get any ‘extra’ on this list, a depth stop is the one to get.
We regret not getting it sooner.
Using tape to mark the depth was a massive time suck, muscle weakener, and mental wrecker—we weren’t sure if we were doing the depth well enough… and many of our depths weren’t deep enough. And so when hammering in our plugs, they kind of smooshed open, rather than cleanly fitting. Most of those logs failed.
If you haven’t already gotten a drill bit on its own, you can still just buy one item. This depth-stop drill bit is what we currently use.
- Drill of choice
- Drill bit (and adapter if needed for modifying an angle grinder.)
Recommended extras:
- Depth stop
- Or depth stop drill bit
Mallet hammer or thumb press
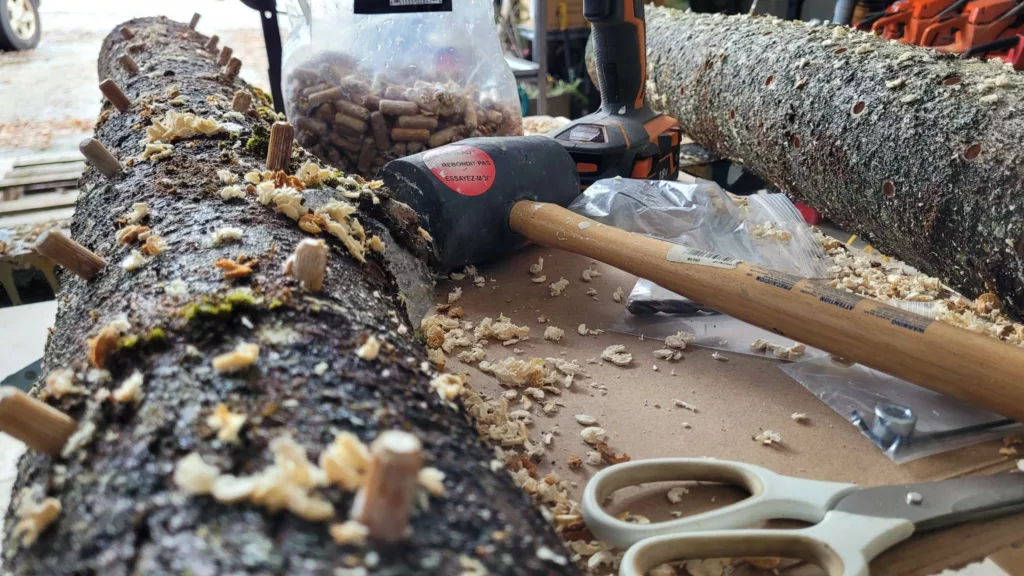
If you’ve chosen the ease of plug spawn, all you’ll need is a mallet hammer.
If you’re going with sawdust spawn, you’ll need a thumb press.
Wax and Wax Applicator
Food-grade wax to seal the logs is essential.
With wax, coat every drilled and plugged hole and the cut-ends of your mushroom logs.
This critical step ensures moisture stays in and competing fungi stay out.
Paraffin or soy wax are your best most cost-effective options.
To apply the wax sparingly, use a foam paint brush, or wool wax daubers.
Wax applicators should be changed between mushroom strains to avoid cross-contamination. You should never plug one log with two different mushroom spawn strains.
Wax Melter
If you don’t have a crockpot, instant pot, or portable stove, then a tea candle under a rack will work as a low-budget option.
I recommend a more reliable source of heat if you’re working in a cold environment or are planning to do more than a dozen logs.
- Bare minimum: a candle and a pot
- Economically essential: portable cooker
- Most efficient: Crockpot or wax melter
A candle under a pot is certainly not the best option. But if you already have candles and a rack to elevate your pot, it will work! We used this for our very first batch of plugging.
Later, we realized we had a portable cooker to use. The issue with this is the wax cools when you turn off the flame to save propane, especially in cooler environments. As the wax cools it builds up in the wax dauber quickly, leading to a lot more waste than if the wax has stayed hot and melty.
The best option for the least waste and maximum efficiency is a crockpot or wax melter. Your wax stays hot so you’ll lose the least amount to the wax dauber.
Log Storage
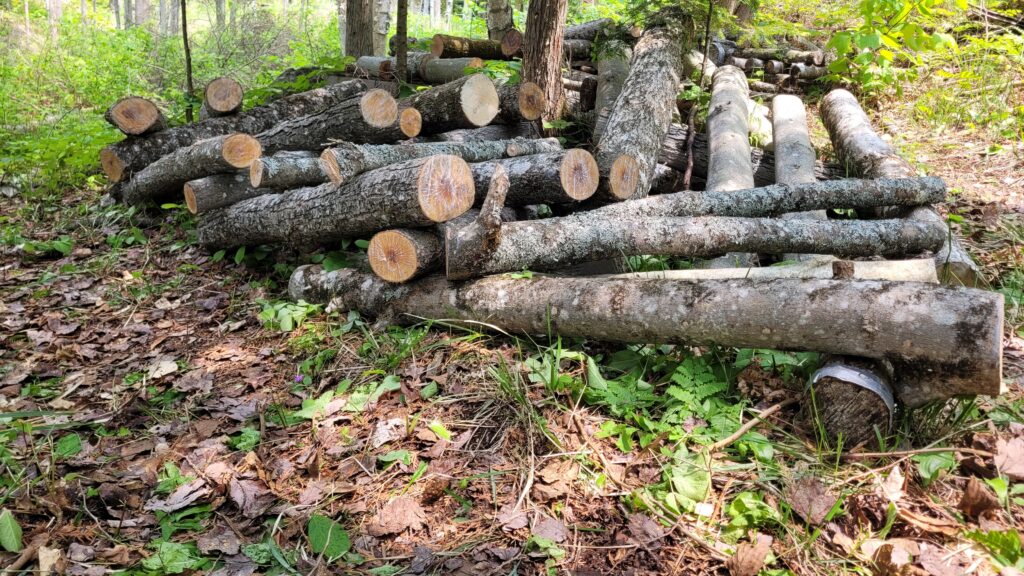
Designate a safe place to set each log aside after you finish them one by one.
We stack them on skids so they can be moved to another location efficiently with an available skid steer.
You may want to stack them directly into a wheelbarrow or cart to take the place where they’ll stay.
See: How To Care for Mushroom Logs (Everything You Need to Know)
Garden Cart or Wheelbarrow
Logs are heavy, so I’d hope their ‘home’ is either not far for you to carry, or you have something with wheels.
A cart or wheelbarrow can transport multiple logs at once to their designated space.
Labels
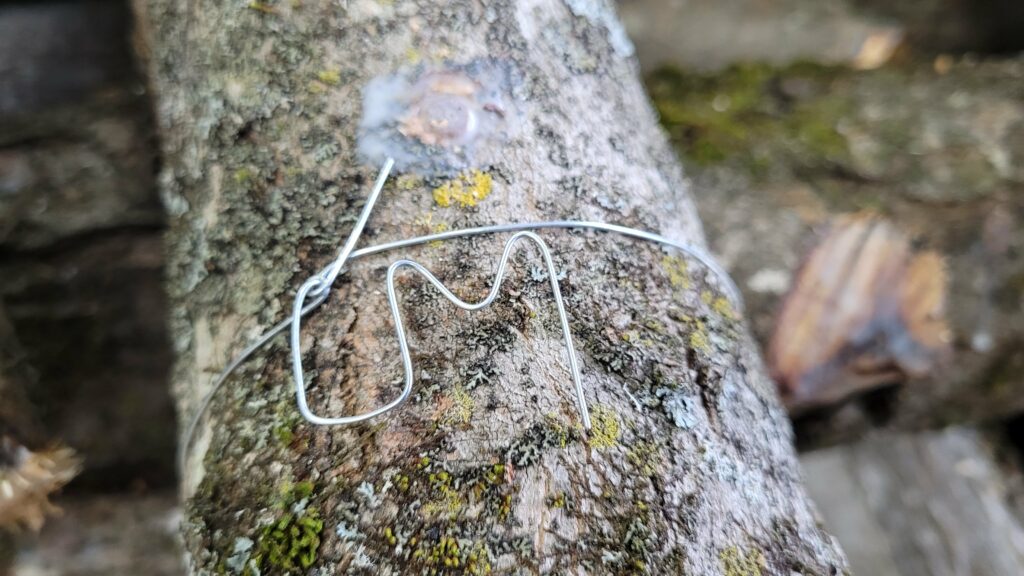
If you’re making more than one type of mushroom log, you’ll find labels handy to see what fruited and failed.
Plus, when stacking them outdoors, you’ll be able to group the same species together rather than mixing them all over the place. Keeping species together allows for easier, less scattered, harvesting later.
We used duct tape and Sharpie in the past to label our logs. But these days, I’m loving my new invention of using wire (see image above).
Duct tape and Sharpie produce waste and introduce unwanted chemicals to the landscape as the wood eventually breaks down.
The wire is reusable and removable. Once logs are in place and fruiting, you can remove the wire and put it away for reuse.
Conclusion
| Bare Minimum | Efficient + economical | Max Efficiency |
| Table | Saw horses | Sturdy saw horses |
| Soaking container | Soaking container | Soaking container |
| Plug spawn | Plug spawn | Sawdust spawn |
| Drill | Drill | Angle grinder |
| Drill bit | Depth stop drill bit | Depth stop drill bit |
| Mallet hammer | Mallet hammer | Thumb/palm press |
| Wax | Wax | Wax |
| Wax dauber | Wax dauber | Wax dauber |
| Candle | Portable cooker | Crockpot/wax melter |
| Pot | Pot | x |
| x | Wheelbarrow | Skids |
| x | x | Forklift |
| Label | Thin wire | Thin wire |
Your success depends on the right tools, and success means mushrooms for years! Skipping out on precision increases the likelihood of failed logs that don’t fruit at all.
For more details information on how to inoculate your logs using these essential tools, I made a complete guide!
See: How to Use Mushroom Plugs Complete Guide
Recent Posts
There’s no shortage of full-sun ground covers for zone 4 climates! Each plant in this list can withstand the frigid temperatures and also enjoy the hot sun in summer. Full sun means that a plant...
There's no shortage of full sun ground covers, not even in zone 3! Zone 3 climates offer hot but short-lived summers and very cold winters. So each plant in this list can withstand the frigid...